Category Archives: Electronics

Balancing robot update

900_DSC_4964

I have made some progress with the self balancing robot. The speed of the motors is now controlled using two cascaded PID regulators. One regulator adjusts the speed of the motors to maintain a setpoint angle. The other PID regulator adjusts this setpoint angle according to a setpoint speed. This new control system allows the robot to return to its original position when disturbed. The robot can also find a new angle for balancing if the center of gravity is moved, or the robot is standing on an inclined plane.

In this video I use the Raspberry Pi for a very basic form of remote control. I connect to the robot using SSH, then I run a serial terminal program on the Raspberry Pi to send ascii characters the the main Arduino. The video also shows an example of video and photo quality from the Raspberry Pi camera.

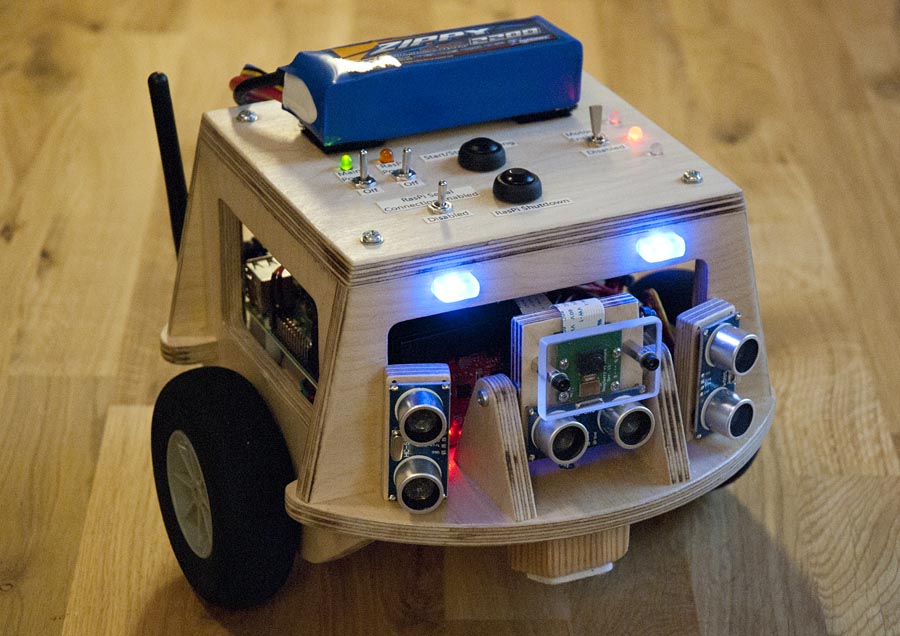
The three ultrasonic distance sensors and the tilt servo for the camera module are not connected yet…

More info about this project here

A new robot project

It was about three years since last time I built a robot. I have learned a lot of things since then, now it is time for a new robot project. Now I have built a self balancing robot based on Arduino. This robot uses stepper motors, the balancing is done using a PID regulator. In this video, the setpoint angle is adjusted proportionally to the speed of the motors to keep the robot from drifting away. Later I will add a second PID regulator for this instead.

Currently the robot can only stand still, but this will be a platform for more experiments in the future. There is a Raspberry Pi 2 installed in the robot. Right now it does nothing, but it will bu used to persorm higher level functions like navigation, obstacle avoidance, remote control and maybe computer vision using the raspberry pi camera module. 

Arduino in the indoor plane

When I built the “Stik Pusher” indoor plane, I installed some LEDs that I did not connect. My intention was to add an Arduino but I wanted to test and make sure the plane worked as expected before I did it.

The main purpose of the Arduino is to monitor the battery voltage, but all control signals from the receiver to the servos and ESC (speed controller) now goes though the Arduino. The Arduino flashes the LEDs located on the fin, motor mount and nose depending on the battery status. If the voltage drops to low, the motor is stopped to protect the battery, but the the control surfaces still works. This is similar to how a normal “cutoff” function in an ESC works. My ESC in this plane in very small and simple and does not have this function built in.

I have also connected a serial bluetooth module the the Arduino for wireless communication. I also plan on connecting an ultrasonic range finder pointing downwards to experiment with an automatic altitude holding feature. This requires tuning some parameters, and this is where the bluetooth connectivity comes in handy. Maybe later. I will also try to control the plane with a smartphone app or laptop using this bluetooth connectivity.

900_DSC_3983

900x_DSC_3994

900_DSC_4008

900ArduinoScematicV1

Arduino based GPS alarm clock

This is a project I have been working on for a while now. The alarm clock features a large 40×7 LED dot matrix display and a easy-to-use user interface for adjusting settings. The clock is controlled by an real time clock module that keeps track of date and time. The time of this module is set using a built in GPS every three seconds if the GPS has a valid position FIX. Read more about this project here: Arduino based GPS alarm clock

900_DSC_3840

900_DSC_3812

A collection of parts to use in SketchUp

When I want to make something I usually start drawing in SketchUp. Often the things I draw never becomes reality for different reasons, but some do. I have tried more advanced CAD programs like AutoCAD or Inventor, but i always falls back to SketchUp. It is a great tool for creating fast prototypes and testing ideas. SketchUp is special compared to other programs in the way that it only has a very limited set of tools. This makes it fast and easy to learn and work with. This also makes it hard to do some complex parts, but usualy, it is not a problem.There is also an “3D warehouse” where users can upload models. It is also possible to download other’s models into your own model. This is great when you want to add some common part to your project, like an Arduino for example. Why draw it again when others have already done it?

When I make my 3D models I save all general parts i think that I will have a use for in the future in a separate file to make them easy to copy. This file contains robotics parts, electronics parts, displays, motors, and some multirotor and Airplane stuff. Most of the things I have made myself but some I have downloaded from the “3D warehouse” and modified in some way.

The file is available for download here: SketchUpParts.zip (8MB)

parts900